Whistling is a timeless skill that blends breath control, mouth positioning, and sound precision into one simple yet powerful action. Whether you want to get someone’s attention across a crowded space, add flair to music, or master a fun personal skill, learning how to whistle is both achievable and rewarding. Despite how effortless it may seem when others do it, whistling is a learned technique that improves with proper guidance and practice.
This in-depth guide explains how to whistle using different techniques, including fingers, hands, and loud projection methods. Backed by practical experience, scientific understanding of airflow, and proven learning strategies, this article is designed to help beginners and intermediate learners master whistling effectively. Every method is explained clearly, with step-by-step insights, common mistakes, and actionable tips to ensure real progress.
Understanding the Science Behind How to Whistle
Whistling works by forcing air through a small, controlled opening while shaping sound waves using the tongue, lips, and mouth cavity. The pitch and volume depend on airflow speed, lip tension, and tongue placement. According to acoustic studies, whistling creates a focused air jet that vibrates sound frequencies between 1,000–4,000 Hz, which the human ear detects clearly even from long distances.
Learning how to whistle becomes easier when you understand that it is not about blowing harder but controlling airflow precisely. This is why many beginners struggle initially—incorrect mouth shape disrupts sound formation.
How to Whistle With Your Fingers
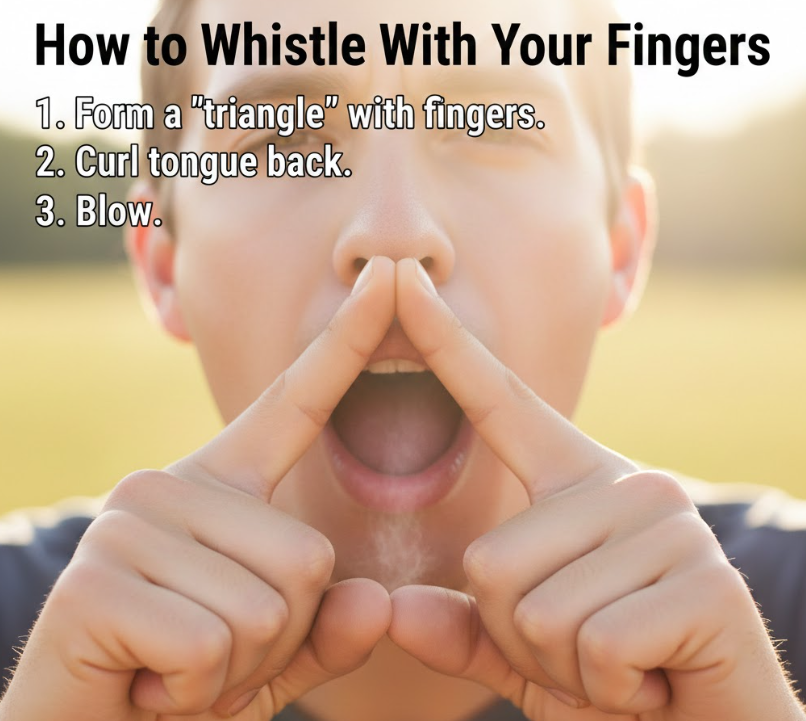
Learning how to whistle with your fingers is one of the most effective ways to produce a loud, sharp, attention-grabbing sound. This technique is widely used in sports events, concerts, and outdoor environments because it amplifies airflow and stabilizes sound production.
This method relies on using your fingers to position your lips correctly while creating a tight airflow channel. Unlike basic lip whistling, finger whistling provides more control and volume, making it ideal for long-distance communication.
Key Principles of Finger Whistling
Finger whistling works by holding the lips in a folded position while the tongue remains flat. This creates a powerful air tunnel that produces a high-frequency whistle when executed correctly.
Step-by-Step Build Points
. Hand Preparation and Cleanliness
Clean your hands thoroughly before placing fingers in your mouth to avoid bacteria. Dry fingers provide better grip and lip control. This step is essential for comfort and hygiene, especially during repeated practice sessions.
. Choosing the Right Fingers
Most beginners use the index fingers or thumbs. Choose fingers that feel comfortable and allow you to control lip placement easily. Comfort directly affects consistency and learning speed.
. Lip Positioning Technique
Fold your lips inward over your teeth using your fingers. This prevents teeth interference and helps focus airflow. Proper lip tension is crucial for sound clarity.
. Tongue Placement Awareness
Keep your tongue flat and relaxed, slightly pulled back. Avoid curling it upward, as this blocks airflow. A relaxed tongue improves sound stability.
. Controlled Airflow Release
Blow air steadily rather than forcefully. Excess pressure causes air turbulence, which kills the whistle. Controlled breath ensures clean sound production.
. Practice and Adjustment
Adjust finger spacing and lip tension gradually. Small changes make a big difference. Practice in front of a mirror for visual feedback.
Also Read:- How to Make Jello Shots – The Ultimate Party Guide for Perfect Results Every Time
How to Whistle Loud
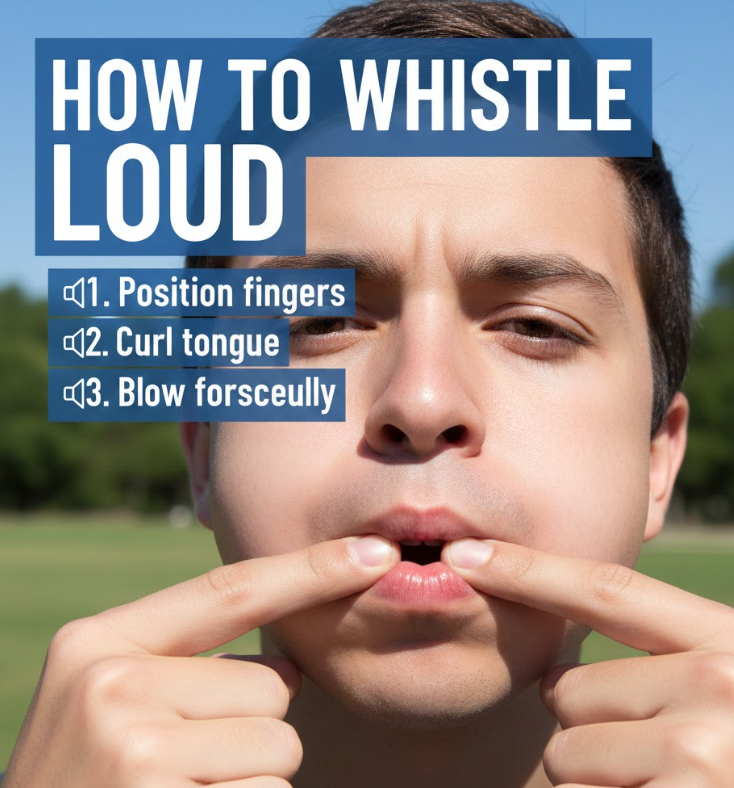
Mastering how to whistle loud requires airflow control, diaphragm engagement, and precise mouth shaping. Loud whistling is not about blowing harder—it’s about directing air efficiently to maximize sound resonance.
Professional performers and outdoor communicators rely on loud whistling techniques that reduce strain while increasing volume.
Why Loud Whistling Works Differently
Loud whistling amplifies sound waves by creating a narrow, high-speed air jet. This jet vibrates against the lips and mouth cavity, increasing decibel output without damaging vocal cords.
Step-by-Step Build Points
. Diaphragm Breathing Technique
Breathe deeply from your diaphragm instead of shallow chest breathing. This provides steady air pressure and prevents breath fatigue during loud whistles.
. Mouth Shape Optimization
Create a small oval opening with relaxed lips. Too tight causes strain; too loose disperses sound. Balance is key for loud output.
. Tongue Position Control
Lower the tongue slightly to increase airflow space. This enhances sound resonance and clarity. Tongue stiffness reduces volume.
. Air Speed Regulation
Increase air speed gradually rather than instantly. Sudden bursts distort sound. Smooth airflow produces stronger whistles.
. Sound Direction Awareness
Aim the whistle forward, not downward. Forward sound projection travels farther and sounds louder to listeners.
. Volume Practice Sessions
Practice in open spaces to avoid echo distortion. Gradual exposure improves confidence and lung control.
Also Read:- How to Make Cold Foam – The Ultimate Expert Guide for Creamy, Café-Style Perfection
How to Whistle With Fingers
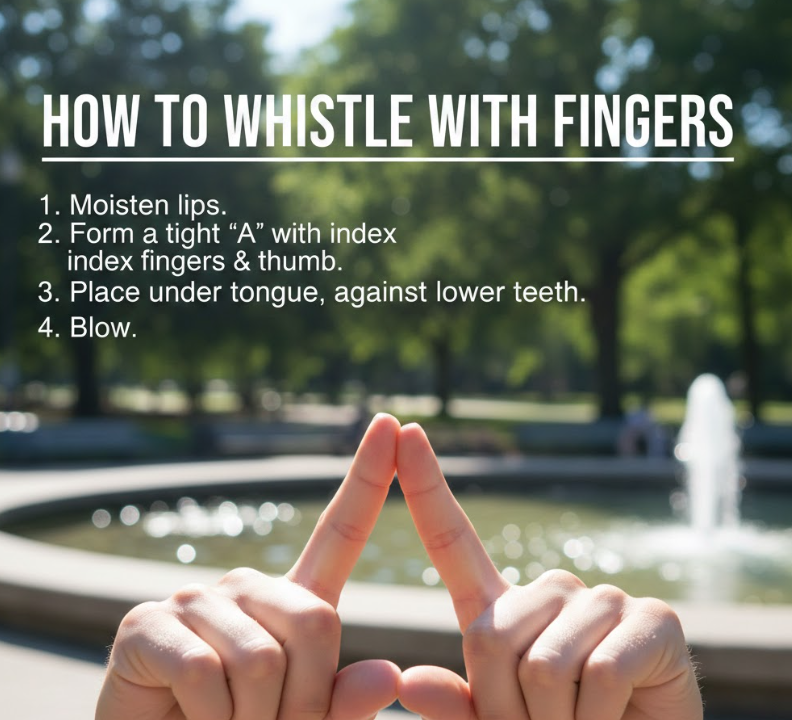
Although similar to finger whistling, learning how to whistle with fingers focuses more on precision and pitch control rather than just volume. This variation is popular among musicians and performers who want controlled, musical whistles.
This method allows you to adjust pitch by changing finger distance and tongue position.
Technique Overview
Finger-assisted whistling improves accuracy by stabilizing lip shape, allowing you to focus on airflow and tone rather than lip movement.
Step-by-Step Build Points
. Finger Placement Consistency
Place fingers symmetrically for balanced airflow. Uneven placement causes pitch instability and inconsistent sound.
. Lip Seal Formation
Ensure lips seal gently around fingers. Air leakage reduces whistle quality and volume. A clean seal ensures focused sound.
. Tongue Flexibility Training
Practice moving the tongue slightly forward and backward. This controls pitch changes and tonal variation.
. Breath Control Mastery
Use slow, controlled breaths. Consistency matters more than power. Stable airflow produces clean tones.
. Pitch Adjustment Awareness
Adjust finger spacing subtly to raise or lower pitch. Small changes create noticeable sound differences.
. Muscle Memory Development
Repeat the technique daily for short sessions. Muscle memory improves precision over time.
Also Read:- How to Draw Eyes: A Complete Beginner-to-Advanced Drawing Guide
How to Whistle With Two Fingers
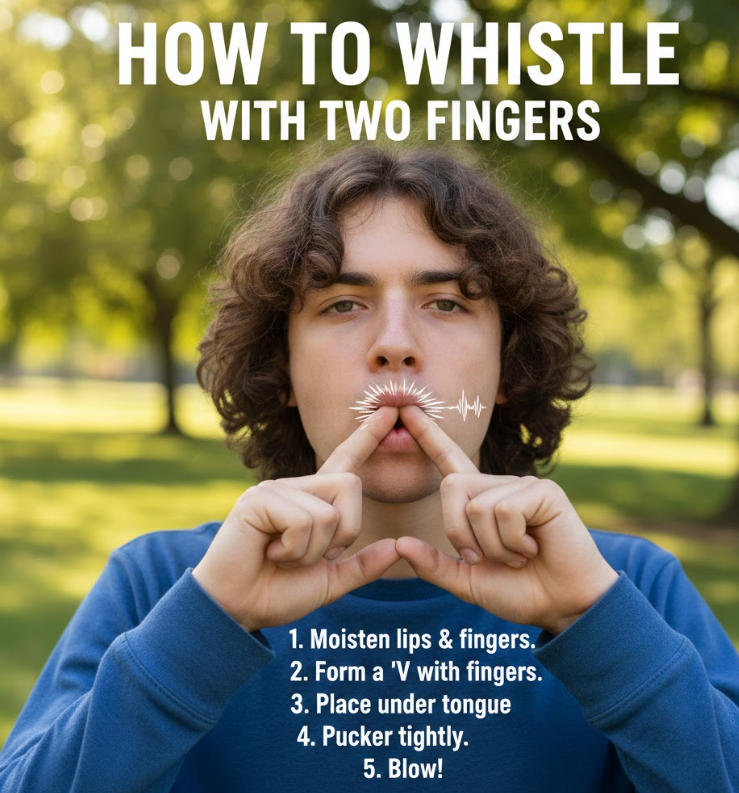
Learning how to whistle with two fingers is the most common finger whistling variation and is often the easiest for beginners. This method offers excellent balance between control, volume, and comfort.
It is widely taught because it simplifies finger placement while producing reliable sound results.
Why Two Fingers Work Best
Using two fingers allows symmetrical lip folding and optimal airflow channeling. This reduces complexity and speeds up learning.
Step-by-Step Build Points
. Finger Selection Strategy
Use index fingers or thumbs depending on comfort. Both options work effectively if positioned correctly.
. Lip Folding Accuracy
Fold lips inward evenly using fingers. Proper folding prevents sound distortion and protects teeth.
. Tongue Relaxation Technique
Keep the tongue relaxed and flat. Tension blocks airflow and causes whistle failure.
. Air Pressure Balance
Blow steadily with moderate pressure. Excess force leads to air noise instead of a whistle.
. Angle Experimentation
Tilt fingers slightly to adjust airflow direction. Angle changes affect pitch and clarity.
. Consistency Through Repetition
Practice short sessions daily. Consistency builds control faster than long, infrequent practice.
Also Read:- How to Delete Cash App Account: A Complete Step-by-Step Guide
How to Whistle With Your Hands
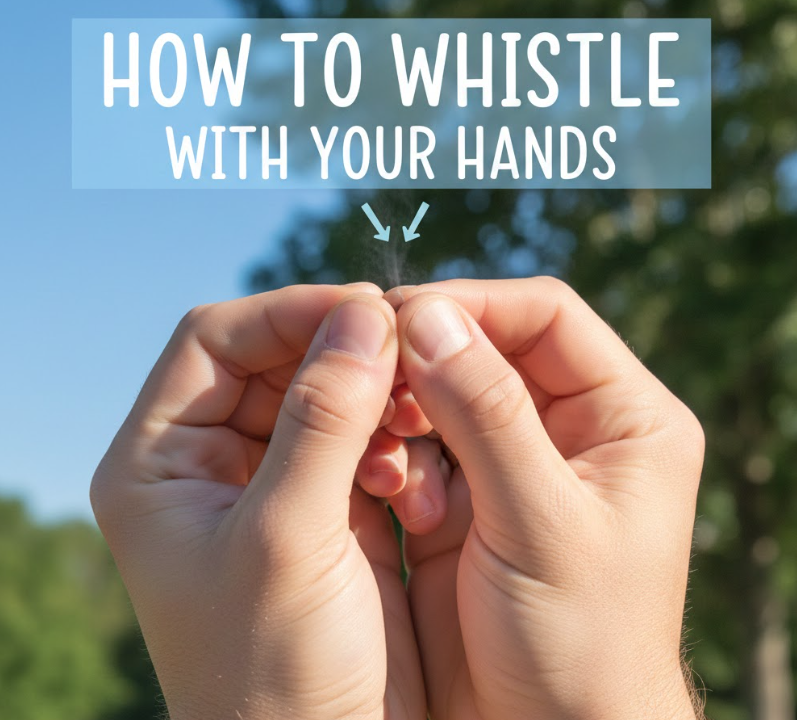
Learning how to whistle with your hands produces one of the loudest whistle sounds possible. This advanced technique is often used at large events and outdoor gatherings.
It involves shaping your hands to create a sound chamber that amplifies airflow.
Understanding Hand Whistling Mechanics
Hand whistling uses cupped palms to create resonance while directing airflow through a small gap between thumbs.
Step-by-Step Build Points
. Hand Position Formation
Cup your hands together tightly, leaving a small opening between thumbs. This opening acts as the sound channel.
. Lip and Thumb Alignment
Place thumbs gently against your lips. Correct alignment ensures efficient air transfer into the hand chamber.
. Tongue Placement Control
Keep the tongue flat and slightly back. This opens airflow and enhances resonance.
. Airflow Direction Control
Blow air into the thumb opening, not the hands. Direction matters more than force.
. Resonance Adjustment
Adjust hand tightness to change sound depth. Tighter cups increase volume.
. Practice in Open Areas
Hand whistling is loud. Practice outdoors to avoid discomfort and echo distortion.
Common Mistakes When Learning How to Whistle
Many learners fail because they blow too hard, tense their lips, or ignore tongue positioning. Whistling is about finesse, not force. Relaxation and patience are essential.
Also Read:- How to Create and Add a Signature in Outlook Easily
Conclusion
Learning how to whistle is a skill that combines airflow control, muscle coordination, and patience. Whether you choose finger whistling, loud whistling, or hand whistling, consistent practice and proper technique will lead to success. By understanding the mechanics behind sound production and applying the structured methods in this guide, anyone can master whistling confidently and safely.
FAQs
How long does it take to learn how to whistle?
Most beginners learn basic whistling within 3–7 days of consistent practice.
Why can’t I whistle even after trying?
Incorrect lip shape and tongue tension are the most common reasons.
Is whistling bad for your mouth?
No, when done correctly, whistling causes no harm.
For More Info Visit Hola-Fly